Friday, August 31, 2012

Slow Home Case Study progress report

There isn't much to report, yet, since we're still settling into our 'Slow Home Case Study' (I really must find a more personable name for our place) and unpacking room by room. Work in progress everywhere means iPhone photos, for now:

(still need to tack the cord management thing to the wall and paint it)
Moving in all the furniture, books, and art that were being used to stage the old house has made a big difference to the feeling of the new house. I'm still figuring out the final floorplan, moving things around, and unpacking boxes. Yesterday I unpacked two giant boxes of things for the dining room and found the cooling rack and coffee grinder we had been missing. It's nice to have my fancy things on display again.


I scored this fantastic 1920s-30s fumed quarter-sawn oak tea trolley for $60 off Kijiji. It needs some minor work where the finish has been damaged, but so much potential for use as a bar cart / server for during house parties and a sewing machine station or mobile office cart the rest of the time. I love the industrial-looking rubber casters. And check out the label from the underside of the top shelf: it tells us it's from northern England, and with a little research in period business directories might help confirm how old it is.


A budget- and family-friendly Ikea Manstad corner sofa-bed in beige has made it into the family room, so movie nights no longer involve camping out on the carpet, and we'll be able to better accommodate overnight guests. (Yay!) Eventually, when the kids wreck the current one, I'll get a replacement slipcover from Bemz or Comfort Works - right now I am loving the idea of linen.


My wonderful husband has installed the central vacuum system, including a clever kickplate in the kitchen meant for sweeping up crumbs.


I'll be spending the Labour Day long weekend painting the front porch, and planting black tulips and purple irises so that our new front door colour (Benjamin Moore's Peerage) is repeated in the landscaping. We've already added furniture and a bin for sidewalk toys on the deck, and while I'm painting the kids will play (DS has a bigger bike to get used to) and have a little lemonade stand.

Dealing with head lice

Despite being an incredibly common problem among school-aged children, head lice are still discussed in whispers in North America. My daughter caught them at school at the same time as several of her classmates at the end of the school year. Since September is a common time for infestations to be found, I thought I'd share our experience in removing them from her hair (and my son's, since of course he had them too, although a fraction as many). We did all of these treatments as a family every time, because the lice spread so easily.

(We followed the house cleaning instructions provided at the very thorough websites linked above, washing our clothes and bedding in the hottest water and drying them on the hottest setting, and vacuuming thoroughly. Head lice are not bedbugs or fleas, and they die after 24-48 hours off a human host, so full-on-hazmat-throw-everything-away is not necessary. Thank goodness.)

Treatment 1, Day of discovery: An over-the-counter permethrin conditioner recommended by the pharmacist at the closest drug store, used according to the instructions (shampoo hair, leave in 10 minutes, rinse out, towel dry hair, comb with provided plastic comb). Unfortunately a growing percentage of lice are resistant to permethrin treatment, and the pesticide only kills the live insects, not the eggs (nits). Supposedly it leaves a residue in your hair that will kill them as they hatch, and needs to be repeated after 7 days.

Treatment 2, daily since discovery: A half-strength rinse with vinegar followed by combing, twice a day. The vinegar helps to remove the glue that holds nits in the hair, so that they can be removed more easily. This worked like magic to remove the majority of the eggs and empty egg casings - but my daughter has lots of very fine-textured hair so the comb could not grab everything. Some people pick the rest out with their fingernails at that point, but my hands are too shaky for that (thanks, essential tremor), so I needed to get a better comb.

Treatment 3: carefully flat-ironing the hair while wet to kill any remaining eggs by heating them - a home remedy I had run across that seemed like it was worth a try. Of course this only works if your child will sit very still, because you need to be able to get right next to the scalp.

Treatment 4: saturating hair with conditioner then combingA friend who lived in the UK said the kit available from this website worked great for her - and I highly recommend the video on it for good advice on how (conditioner keeps live lice from evading the comb because they won't move while wet!) and when (at least every 3rd day (after any missed eggs could have hatched), until day 14 or when the lice are gone, whichever comes last) to use the comb. This is super important!

Treatment 5, Day 6 after discovery: The Nit Nannies kit, purchased locally from Beaners, a kids' haircut chain. It includes a mineral-oil based treatment (to suffocate the insects; it also contains an ingredient that dissolves insects' exoskeletons, and more vinegar), shower caps (because you leave it on for 2 hours, and it's messy - you'll also want a towel draped over shoulders to protect clothing from drips), and two combs (one metal that looks similar to this one, and one very fine-toothed plastic one with a magnifier on it, both of which work better than the comb we were using previously).

If you don't have local access to Nit Nannies, you could try the mineral oil / vinegar 50/50 solution in its place, combined with an isopropyl myristate rinse (another chitin dissolver). You don't have to use mineral oil - olive oil or canola oil will work too - but it's colourless and scentless so it's usually what's recommended.

I'm mentioning this kit by name, instead of in generic terms, because it's the one that worked best for us, alongside a careful combing procedure, AND it's an environmentally friendly option. When we did our 7-day retreatment with permethrin the following day, there was nothing left to comb out of my children's hair. 

We continued checking daily for the next couple of weeks to be sure, and found a couple of additional insects during the second week, but by the third week we found nothing. Continuing to comb even when you find nothing is crucial to make sure you don't end up with a single missed egg turning into a whole new infestation - as we discovered to our chagrin in week five, when we found a dozen or so insects in my son's hair, and two more in mine, and started the cycle over again. We are now at week 10 since we originally found the lice, and we haven't seen any nymphs or nits since week 7 during religious combing with conditioner every third day, so I think we can finally loosen up our combing schedule. We'll continue to comb once a week through autumn and winter just to make sure the kids haven't picked up more at school.

We also use a preventive hairspray with essential oils in it (geranium, lemongrass, and peppermint is the combo in the one I bought), although that feels more like we're spritzing it for good luck than because of any proof that it works.

Here's a couple of good summaries of head lice myths and facts. I'll add a few more:

1. Hiding from your kids how utterly icked out you are about the whole thing is way, way harder than the actual tedious act of nitpicking.

2. Anecdotally, it appears from many of the articles I've linked to that lice infestations are becoming more common among school-age children worldwide. I haven't found any actual numbers though.

3. Head lice don't carry disease, have no preference for dirty hair over clean, and are found infesting children of all socioeconomic demographics. This bears repeating. It's not your fault if your kids get this, and nobody should be shunned because of it.

4. Insensitive parents who loudly gossip about which disgusting children are responsible for the notice sent home from school to check your kids' heads, will probably get their comeuppance when their kids get lice next year. (Karma's a bitch when you are.) They can also be easily derailed by breezily saying, "Oh, one of those kids was mine, sorry! I was so grossed out! I never thought it could happen to us. But here's what I found really worked..."


Tuesday, August 28, 2012

Three Weeks In The Maritimes

My family recently went for a visit to Nova Scotia to spend time with our extended family.
Our primary goal was to let the kids connect with their family and develop a feeling of Nova Scotia as a second home - 
and for me to see my grandmothers, and my sister who was visiting during our stay.
So naturally, most of our time was spent hanging out with our family,
but we also managed to fit in a lot of time playing on beaches,
tall ship viewing and a harbour cruise on a ketch,
a humpback whale watching tour, and a short side trip to Prince Edward Island.
We even squeezed in some grown-up time for brunch dates (just me and hubby!) 
and a handful of visits with dear old friends.

Let it wash over you. Conrad's Beach, NS.
Titanic model in the pond at the Halifax Public Gardens. Did you know about Halifax's connection to the tragedy?
Of course we also had to find the bench under the weeping willow, and have some Oxford blueberry ice cream.
Parade of Sail, Tall Ships 2012, viewed from the Nova Scotia Hospital grounds. Peacemaker (barquentine).
HMS Bounty, Gazela, and Amistad turning between Georges Island and McNabs Island (in the background).
HMS Bounty replica. Georges Island is in the background.
Amistad replica (topsail schooner) in a cloud of gunpowder smoke from her cannon. It was loud!
The enormous USCGC Eagle (barque).
Notice the Clock Tower and Citadel Hill behind downtown Halifax.
Tide's out, on Brier Island, NS, just before our whale watching tour. Brier Island sits at the mouth of the Bay of Fundy, a three hour drive and two short ferry rides from Halifax. We also visited an antique shop, a gift shop, a restaurant, a rug hooking studio, and walked the trail to Seal Cove while we were on Brier Island.
Humpback whale diving, photo by Joanne Merriam (my sister), from her blog post describing the whale watching tour. I didn't get any photos myself (too seasick), but WOW. We saw 8 adults and 2 very playful calves, lots of seabirds, and at one point witnessed a pod of Atlantic white-sided dolphins wake-riding - and one of the mother humpbacks vocalizing in annoyance to tell them to buzz off.
Balancing Rock (columnar basalt), Long Island, NS. We walked this steep trail with lots of stairs on our way back to Digby for a late supper (the most delicious scallop chowder ever, in my case).
Conrad's Beach (again), NS.

 Playing in the vast tidal flats at Scots Bay, NS. Photo by Peter Merriam.
This gives you a sense of how far out the water goes at low tide on the Bay of Fundy. 

 Martinique Beach, NS. Photo by Peter Merriam.
We drove to Prince Edward Island over the Confederation Bridge, which has turned the former ferry town of Borden into 'Gateway Village' and reduced the ferry service to a tourist curiosity. As we crossed the bridge, I joked that I was disappointed that they've not yet built a giant statue of Anne about to smash her slate over Gilbert's head. The Island is  ridiculously pretty, with its patchwork of farm fields and sea views and saltbox architecture,
but it was Green Gables that we had come to see (I have a nine-year-old daughter.).
The Lake Of Shining Waters, MacNeill's Pond boardwalk trail at Cavendish Beach, PEI.
 
Red sandstone cliffs, Cavendish, PEI.
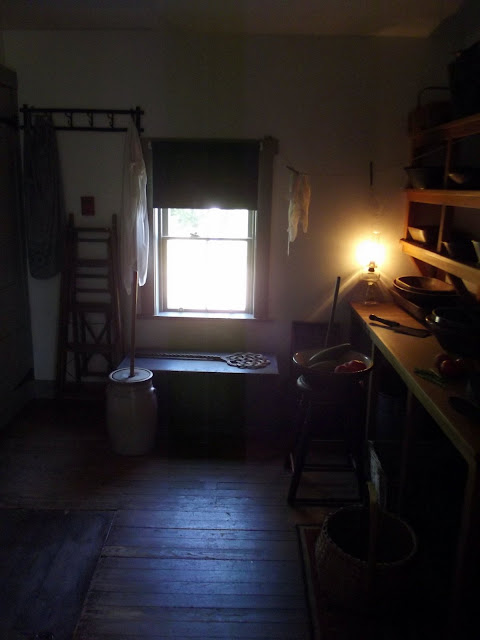
Early 20th century pantry inside Green Gables. 
Green Gables is the former home of cousins of Lucy Maude Montgomery, and the inspiration for the Cuthbert farm where Anne Shirley is adopted. Parks Canada have the house set up inside to approximate what it would have looked like in the book (there's even a dress with puffed sleeves hanging in the closet of Anne's room), and outside there are walking paths along Lovers' Lane (which really does have a Babbling Brook), and through the Haunted Wood to the foundation of the house where Montgomery actually lived with her grandparents. 
The gorgeous wind turbine array outside Amherst, NS near the border with New Brunswick.
And an accidental self-portrait.
Instead of driving straight back to Halifax from PEI, we took the long (long!) way along the Parrsboro shore, through River Hebert (where my mother-in-law grew up) then over Cap d'Or to Port Greville where my Dad grew up, then through Parrsboro back to the main highway. This is the view of the Bay of Fundy from my grandparents' front yard.

Back in Metro, we took the kids for a harbour cruise on the Mar II, a two-masted ketch built in the fifties. This is one of the winches near the rear mast, with a chromed internal mechanism reminiscent of a three-speed bicycle's rear hub.

There was enough wind that once we were clear of the docks, the captain was able to cut the motor and operate entirely under sail. This 'pirate cruise' was also very child-friendly, with a crew member in costume whose job was to entertain kids below deck with stickers and stories. A group of kids (including mine) were recruited to help hoist the big sail on the rear mast, and afterward they all got to take a turn holding the helm for photos.
Three weeks is enough time to fool yourself into thinking you can fit lots more into your schedule, especially if you are planning to need another vacation after your vacation. My mental list for the trip had included visits to the local bike shops and harbourfront bike rental place, time roaming through antique shops and art galleries, meals at some favourite restaurants, and time at the archives working on my family tree. We had lined up a long list of rainy-day activities in museums that we never had a chance to use. However, we decided to take it easy and spend our summer the way we would if we lived in Nova Scotia, and recreated some of our childhood memories for the kids.
In the end, it was family, friends, and the sea that called us home
and we're very happy with how much we were able to share with our children. 

Monday, August 20, 2012

Slow Living: A Home Pottery Studio Tour

Slow living isn't only about living locally, sustainably, with handmade things you love, in a way that supports and celebrates your community's traditions and skills. In an ideal world, slow living includes setting aside space and time for creative pursuits. Learning and practicing an art or craft can enrich your life and be incredibly fulfilling.

While there are lots of professional studio tours on ceramics blogs like (Mud)Bucket, I thought you might be interested in seeing the home pottery studio of a passionate hobbyist, my talented mother Sharon Merriam.

Sharon Merriam at work in her home studio. Photo credit: Peter Merriam.
Mom has moved between media for most of my life. When I was a child, she did sewing, macrame, crochet, and embroidery; when I was in my teens she began life drawing and watercolour, and went on to printmaking. She immersed herself in workshops and extension courses from the local fine arts college. About a decade ago, she began taking pottery classes and workshops, and she was instantly hooked. Ceramics is now her primary medium, and we rarely have a phone conversation where she doesn't report on her latest pieces or the glaze combinations she is trying. The walls of her work have become thinner, her designs more adventurous, her range of techniques more comprehensive, and she has joined a potters' guild and shown her work alongside that of professional potters. At this time, she is enjoying expanding her skills, and has artistic freedom to spend time and effort that she could never afford to give a single piece as a production potter.

Here are some photos I snapped around the house of her work:

A collection of yunomi and glaze test chips on a table in the living room bay window.
A series of sculptural works based on the female figure line the stairs.


This is the first in a sculptural series using thrown rings. To the right is a raku vase.
The wave-shaped tray is her most recent experimental piece. The large vase was wood fired.
The creation of this version of Mom's home ceramics studio has taken years. Before she took up pottery, she had a portable easel, and a corner of a spare bedroom that was used to store supplies and reference books and her works on paper, and most of the artwork on the walls was gradually supplanted with her best work. When she began her love affair with ceramics, she did all her work at Atlantic Pottery Supplies, during classes and studio time. She found that arrangement limiting as she became more skilled and more serious about her craft. After renovating to install a new laundry room in an upstairs storage room a few years ago, the laundry room was converted into a home studio so she could practice throwing (that is, using a pottery wheel) at home. When she purchased an electric kiln last fall, that room became the kiln room (with some electrical work and the addition of a kiln vent fan), and a storage room in the basement was cleaned out and converted into the new throwing-drying-and-glazing studio with the addition of a ventilation fan and a sink. A table for hand-building lives in the basement rec room, and the storage for the pieces she has made has happily spilled over into many rooms of the house.

The electric kiln in its own room, a former laundry room. That thick black cord is the electrical cord for the kiln, which was professionally wired to a lockable box with the sort of on/off switch you see in factories in the movies. The white cord in the background is for a vent fan in the window.
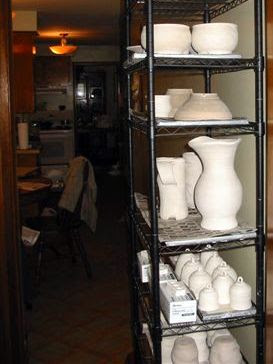
Bisqued wares await glaze on a shelf in the hallway near the kiln room. Photo credit: Sharon Merriam
My kids making pinch pots with my mom at the hand-building table in the basement rec room.
The long, narrow storage room was converted into a ceramics studio with two sections. This shot was taken from mid-room, of the glazing area and the sink (there is a washroom on the other side of that wall that made plumbing in a new sink possible).
Shelves of tools and projects at various stages of completion line the walls.
These are trimming and carving tools.
Handmade brushes for glazing.
Glaze ingredients and premixed underglazes. 
Ready to start throwing. The day I took these photos, Mom threw a cylinder for a project we are collaborating on.
 
Using ribs to throw and compress the cylinder's walls. 
Checking the height - not tall enough. That's a sketch of my sister on the wall.
  
Compressing the lip of the cylinder before she cut and stretched it.
Notice the sculptures on the shelf above her head.
Compressing the edge of the cut-and-stretched cylinder. The reason we did this instead of using a traditional slab approach was that the throwing process gives the clay a more organic feeling.
Ready for the next phase!
This is after the next phase: once the clay was leather-hard, we cut the thrown-and-stretched slab into tiles, and I transferred my design onto them and carved out the outlines. It's a Craftsman-inspired ceramic address plaque, showing a heavy Glasgow school influence. 
Here it is with the underglazes painted on. It's hard to tell from the photo, but variation in how many coats of underglaze were used will affect how dark it will be after firing - and the colours after firing will dark purple and dark green. After it has been bisque-fired, the remaining glazes will be added, then it will be fired again.
Viewing photos of the studios of professional artists and writers can be inspiring, but seeing how a passionate amateur integrates their craft study and practice into their home and life can have different lessons. Sometimes, our creative pursuits and passions are not easily contained in a single display case or dedicated room, and that's okay. As the witticism goes, creative minds are rarely tidy.

If (unlike my mom) you're striving for a minimalist version of slow living, there are ways you can manage the chaos that creativity brings. You can have a live/work arrangement like hers, with extra systems in place that help you contain the mess while you are working - professionals with live/work studios would be good models to follow for this. You can choose to work in a separate studio to manage the chaos that creating large works can bring. Alternately, you can be very deliberate in choosing a medium where completed works and works in progress can be stored compactly, or even digitally.

If your personal style is more maximalist, having a live/work space and surrounding yourself with your influences and your own creations is an inspirational way to have a slow home!

{21 Aug 12 Update: edited slightly to reflect feedback from my mother.}