Showing posts with label slow textiles. Show all posts

Sunday, July 3, 2016

Adapted design: "Blue Darner and Wild Rose"

Our guild had the opportunity to exhibit our work at a local library recently, and our learning and development team decided to make it a challenge: insect rugs, about eight inches square. I decided I wanted to hook a local dragonfly species, hovering over a local flower.

After a lot of sketching, I ended up with a design that's heavily influenced by the American Arts-and-Crafts movement. The background is inspired by the abstracted square rose designed by printmaker Dard Hunter during his Roycroft period. The dragonfly in the foreground is adapted from a Dragonfly Tile by Detroit's legendary Arts-and-Crafts ceramicists Pewabic Pottery.

April 17th: I'm doing the dragonfly's wing by layering clear elastic (that stuff from the shoulders of blouses) over the cochineal-dyed wool of the rose underneath. Taking forever because it's both stretchy and slippery but it looks so cool! (The width of the elastic is identical to the width of a #6-cut wool strip.)


You can kind of see in this detail shot that I need to hook in the elastic loop high, hook in the wool loop below it, then adjust the loop heights and align them as I go. It's slow, finicky work.

May 8th: The wings with the layer of clear elastic are taking me forever, so I switched to working on the background.


May 13th: I'm switching back and forth between background and wings, because I need to know the correct values for the background before I hook in the wing. The pink is a mix of wool flannel and wool yarn dyed with cochineal, and I'm geeking out a bit about using insects to dye the materials for my insect mat.


May 14th: almost done!


May 30th: Finished and pressed**! But my beaded border went higgledy-piggledy where it's adjacent to yarn and needs persuasion to behave itself.* 'Blue Darner and Wild Rose', wool flannel, wool yarn, and polyurethane elastic on linen. Cochineal and goldenrod used to dye the background. Finished size 9.5 inches h x 9.0 inches wide. 


*In the end, I concluded that the only way to get it to behave itself would be to hook one row of fabric all around to contain the yarn, then do the beaded border outside that - but it's already bigger than the dimensions we were meant to stick with, so I left it as is.

**I carefully went around the wings when I was steaming it. I wouldn't want to melt the polyurethane after all that work to hook with it!

June 7th: My "Blue Darner and Wild Rose" is on exhibit for the month of June 2016, alongside other insect-themed rugs by members of the Edmonton Rug Hooking Guild, at the Riverbend Branch of Edmonton Public Library.


Tuesday, October 13, 2015

TIGHR Back To Nature friendship mat

At the last possible minute, I decided to attend this year's Triennial Conference of The International Guild of Hand-hooking Rugmakers (TIGHR) in Victoria, British Columbia (Canada). I last went in 1997 when it was held at Oak Island near Mahone Bay, Nova Scotia, when the guild was much smaller. I was so excited to be in Victoria - the other attendees are all so incredibly gifted and generous with their mentorship and friendship. It was so humbling and inspiring.

I am Storifying the live tweets and instagram photos from the conference here. (They're still trickling in, the weekend after the conference.)

One of the new-to-me traditions of the guild is the exchange of small (5"x7") 'friendship mats' with other attendees. This year, the theme was "Back To Nature", and we could interpret it however we liked. My first thought was that I should use only the fabrics and yarns I've dyed in my ongoing natural-dyeing experiments.

A recent small-scale dyeing experiment with Dorr woolen fabric and (L-R) caragana, goldenrod tops, tansy tops, trembling aspen leaves, logwood chips (and a smidge of iron), and cochineal.
After dyeing, from the top: goldenrod, cochineal, horsetail, logwood (iron modifier), undyed.
My design needed to be a small, simple sampler - and needed to still look great if the materials I've dyed turn out not to be light-fast and fade to beiges and greys. I decided not to draw anything on my backing, and just make it up as I go. After piling up my materials and squinting hard at them, I decided what I had was a sunset or sunrise scene, and I went from there. (Of course, I also needed to remember that some of the experimental ones might not be fast, so I needed to keep in mind that they may fade to grey or beige over time, too. Some might see that as a flaw, but I prefer to think of it as time adding another dimension to the textile art.)

Work in progress, hooking without a drawn pattern. Unless otherwise noted, all the wool fabric is Dorr natural, was dyed without a mordant, and was cut at #6; and the wool yarn is Custom Woolen Mills (Alberta)'s Mule Spinner 2-ply, pre-stripped and alum-mordanted, hooked two loops to a hole.
Finished hooking and needs binding! From top-to-bottom: indigo, logwood (cold processed, iron modifier), red cabbage (ecoprint on 20m/m silk habotai scarf, alum mordant, hand-cut), cochineal, eucalyptus (alum mordant, ecoprinted then immersion-dyed), goldenrod, saskatoon (exhaust bath, alum mordant), saskatoon (full strength, alum mordant), black hollyhock (basic pH), black hollyhock (neutral pH). The saskatoon dye is the most likely to fade on this piece.
Sunrise Sampler #1 ('Back To Nature' TIGHR2015 friendship mat). After binding (by whip-stitching with the saskatoon-dyed yarn) and pressing.
When I was finished, I instantly decided I needed to hook another one, to keep.

Work in progress, Sunrise Sampler #2 - the colour is a bit too blue in this shot, thanks to my phone's poor camera. I imagined this as the same sunrise, framed a bit differently, taken a couple of minutes later so the sun is higher on the horizon.
Sunrise Sampler #2: from top to bottom: indigo, logwood (cold processed, iron modifier), cochineal, beet (tannin mordant), onionskin (alum mordant, ikat resist). eucalyptus (alum mordant, ecoprinted then immersion dyed), goldenrod, saskatoon (exhaust bath, alum mordant), saskatoon (full strength, alum mordant), horsetail, black hollyhock (basic pH), black hollyhock (neutral pH). I think I'll frame this one, so I can note all the materials on the mat. Saskatoon, onion, and beet are all likely not to be colourfast.
I think this is the beginning of a series - I'd love to hook more of these little landscapes using only my naturally-dyed materials.

My friendship mat among others. (Clearly I need to work on getting my natural-dyed materials darker so I can do one with a greater range of values - seeing my mat next to one with an orca in it really points out how pastel it still is.)

Thursday, August 6, 2015

Deanne Fitzpatrick 'Salty Swimmers' workshop, and 'Port Greville Poppies' pillow

The timing of my family's trip to Nova Scotia last summer allowed me to take a one-day workshop at Deanne Fitzpatrick's gorgeous studio, so of course I jumped at the opportunity.


The store itself is like a candy shop for textile junkies, in a beautiful old building in downtown Amherst, NS, filled with both hooking and knitting supplies (this photo just shows one corner of the front room). The walls are hung with Deanne's inspiring work. I can't properly express what a treat it was to see art like her recent Iris In The Rough in the flesh - photos almost don't do it justice. 

I think I'd come the farthest for the class; there were hookers of all levels (including other teachers) from across the Maritimes and New England there. We were welcomed to the light-filled salon where the workshops are held, invited to pour ourselves a cuppa and grab a snack, and treated to a master class in fearlessly modifying a design to make it your own, creating personality without losing the abstraction and painterly, gestural quality that typifies the best in primitive rug design, and mixing textures to add interest to the piece. Deanne has adapted her notes from the class to create her online course "The Swimmers", and I highly recommend that you fellow rugmakers check it out! She's also written a newsletter from 2013 with tips on working with texture.

Here is my early work in progress from the class:


I'm a slow hooker, thanks to essential tremour and my early mentors belonging to the finicky-fine-shading school of hooking, so this is as much as I had finished after a couple of extra hours on the day after the workshop. As you can see from my labels, I chose to make my version of the Three Swimmers myself, my mom, and my sister. I'm especially pleased with how my wrap skirt and my sister's braid add motion to the piece, and the two extra-long loops in the centre made the perfect bow for the polka-dot bikini's halter top. By the third figure (my mom) I had finally mastered the dotted-line outlining technique that Deanne had taught - when I add the background you'll see what I mean.


A few days later in mid-August of last year, with a bit of the background in and a couple of the ribbons laid on to remind me of my colour-planning for the piece. You can really see the gorgeous sheen of the recycled sari ribbon in this shot. I should probably point out that I've exaggerated my mom's curly grey hair with my fun choice of yarn (the 'Sooty Santa' curly mohair from Encompassing Designs in Mahone Bay) - it really isn't quite that wild and woolly in real life.

I put it away for awhile, because I wasn't entirely happy with the materials I had assembled for the sea in the background - but realized that some yarn I had dyed in early July using MAIWA's indigo powder was the perfect thing to pull it all together:

In order from top to bottom: Custom Woolen Mills (AB) Mule Spinner 2-ply, scoured then given 6 dips in a chemically-reduced indigo vat; 'sexy jersey' from Deanne's shop; Mirasol Peru Pima cotton - silk blend shade 1511; Dorr wool graded swatch 6-15 blue (part of the huge stash I inherited, which I'll write about soon); slightly tweedy 2-ply wool yarn from Briggs & Little (NB). Not included is the grey sari chiffon or the blue/metallic sari ribbon that I've also used.
Work-in-progress photo I posted on my Instagram account 3 Aug 2015
I'm soooooo close to finished as I write this! Just a few rows of yarn to go.
Update: Completed rug, 10 Aug 2015. The dimensions are 12 inches x 8 inches.
This will be framed made into a cushion as a gift for my mom. (Even if she finds the curly mohair I used for her hair offensively grey. Sorry, Mom.)

Update: after consideration, Mom decided to display it on top of her antique sewing machine table. The finished mat with whipped edges can be seen on my Instagram account here.

I also couldn't resist picking up the kit for Deanne's new design 'Port Greville Poppies' while I was in the shop. My dad grew up in Port Greville, and one of his aunts had planted poppies that still volunteered year after year on the hill above the old Wagstaff & Hatfield shipyard when I was growing up, so this design really resonated with me. I'll change the colour planning somewhat from Deanne's version, to a leafy green background, but the coral-red and eggplant shades and textures included in the kit are so scrumptious that I just had to keep them. Right now I'm playing with doing a petal with the lightest colours as the flares in the petal base and grading to the darkest shades on the outside of the petal, but I may decide I'm not happy with it and pull it all out to start over.

Port Greville Poppies, on linen, work in progress.
Colour looks a bit washed-out in this photo to me.
My goal with this rug will be to hook faster and looser than I typically do - I really feel that my technique will benefit from that exercise. The hardest part of that has been resisting the temptation to fine-tune the length of every.single.loop as I go. Old habits die hard, but this is one well worth breaking.

Tuesday, September 16, 2014

Arleen Brown's beautiful hooked rugs

While I was home visiting family this summer, I had the pleasure of spending an afternoon with my maternal grandmother's sister, Arleen Brown, who is still hooking gorgeous mats in her nineties despite blindness in one eye. Aunt Arleen learned to hook from my great-grandmother while growing up near Lunenburg, and still closely adheres to the traditional South Shore Nova Scotian techniques (also described in the print edition of Rug Hooking magazine, in the Canadian Connections article about Leslie Langille's rugs)(Vol. XXV, No. 5, March/April/May 2014). Her designs are drawn onto burlap backing, the edges are turned under and crocheted to finish and hide them, and then the mat is stretched on a frame and the design is hooked right to the edge, perfectly even, with no backing showing, and straight lines used for the background. They are a technical tour-de-force.

Arleen showing us photos of her other rugs.
An antique pattern from the Eaton's catalogue that her mum had given her to hook as a young woman. She had me trace this onto red dot fabric so she can rehook it, now that the original backing has become brittle and started to shred.

Chickens are one of her favourite subjects.

Sunday, September 7, 2014

Still hooked on rug hooking: a yarn mat and 'Just Marbelous'

I have many hooked rug projects, at various stages of completion, and the #30DaysOfMaking Challenge seemed like the perfect time to pull them out and really rekindle my passion for rug hooking.

(No, not latch hooking, you children of the 80s. I'm talking about the much older technique that uses a crochet-like hook to make a running loop stitch using fabric scraps cut into strips. It began as a thrift craft, and is carried on now as a textile art with multiple styles, from folk-art 'primitive' designs using wide cuts and reclaimed fabrics to meticulously-shaded 'traditional' designs using narrow cuts and specially-dyed new material.)

I. Hooking with wool yarn


Feb 14th, reverse side of a Cheticamp-style rug hooking kit using two-ply wool yarn on burlap. I bought this a couple of years back at Jennifers Of Nova Scotia as a gift for my daughter, to help her learn to hook, but it became mine when she became too frustrated with the slow pace of hooking in nearly every hole and the yarn loops pulling back out on her. We'll try again when she's a bit older. This piece was meant by the original (unnamed) designers to be a round mat to protect a table.
Feb 19th, showing all the kit pieces (except the hook, which was made by my father for me,
the hoop, and the stork scissors). As you can see, I modified the design quite a bit, in order to commemorate a whale watching trip to Brier Island, Nova Scotia - I took out the enormous seagulls and added a whale watching boat, a whale tail-lobbing, and a couple of brier rose bushes. It's a bit folkier and busier than I would like, and I'm not happy with the lighthouse (which was hooked exactly as drawn on the burlap). Hooking with such fine yarn can be tedious, because it takes longer to fill a motif than if you're using fabric strips, and the loops have a mind of their own, so the direction of your hooking is lost. The trick is to lose yourself in the moving meditation instead of overthinking it.
Finished and framed, on March 11th. Destined for a bathroom wall, I think.
II. "Just Marbelous"

Detail of "Just Marbelous", primarily wool fabric on cotton monkscloth, March 7th. This rug is my own design, inspired by my collection of antique handmade marbles, many of which we believe were childhood gifts from my dad's maternal grandfather to him, but the bulk of which were won during dad's childhood marbles bouts in New Glasgow. They're like miniature works of art glass, and made the perfect subject to challenge my skills in hooking circles, working with many widths of woolen fabric strips (mostly #3, #4, and #5 cuts), and working with multiple materials (the marbles also include spot-dyed and dip-dyed fabrics, a couple of types of yarn, and a metallic-laminated wool). The biggest challenge in it was the temptation to overpack, but the result of that was that a few of the marbles took on a domed appearance - a tripping hazard on the floor, but a pleasing effect in a wallhanging. It would also make a brilliant stash-busting project, although in my case the materials were leftovers given to me by friends from the Dartmouth branch of the Rug Hooking Guild of Nova Scotia, back when I began hooking.

The date on the rug is 1997, when I began it, and the reason it has taken me so long to finish is that the matte black wool that I chose for the background, to show off the bright colours of the marbles, is an absolute bitch to hook. Never again! It requires bright daylight for me to be able to see what I am doing properly, and a drum-tight stretch on the hooking frame (because I chose monkscloth as the backing). I have, however, found that the little purse-size OttLites can be clipped to the neckline of your shirt, at the point of a V-neck, if you need to shed a little light on the situation.


Here's a work-in-progress photo and a detail photo from July 30th. You can see by this time I'd added this year's date, which commits me to finishing this by the end of December. I'm determined to get this background finished before the short days of winter hit. So I brought it on vacation with me.


My work-in-progress cellphone shot from August 17th, while on vacation in Nova Scotia. In this photo you can really see the domes where I overpacked the loops early on in the process. Every bit of black background that I add makes the marbles pop more, which is so satisfying. Before I can complete the rug, I need to cut more #3 and #4 cut of my flat black to fill the remaining spaces. I also need to hook in a few more rows of the teal border. 

Hopefully the next time you see a photo of it here, I'll be celebrating its completion!
Note: This post is part of my #30DaysOfMaking Challenge. 30 nonconsecutive days, as it turns out.

Wednesday, May 21, 2014

Slow Textiles: Experiments in Natural Dyeing

My fascination with natural dyes continues unabated! Here are more of my experiments with immersion dyeing, bundle dyeing, and rust dyeing from the past couple of months.

I. Bundle dyeing

Quick-and-dirty bundle dyeing (aka eco-dyeing/printing, originated by the inspirational India Flint) instructions: Wet prewashed & premordanted cloth, lay out the dyeing agent (leaves or flowers), then roll the cloth around a stick or a copper pipe. Steam or boil for 60 min. Allow to dry for as long as you can stand (ideally weeks, overnight at minimum), then open the bundle.

What I actually did:


Tuesday, May 20, 2014

Slow Textiles: Experiments in Dyeing using Black Beans

Inspired by these blog posts found via Pinterest, I soaked black beans (no-name brand from the grocery store, 1 cup, in 8 cups of tap water) for about 24 hours at room temperature (then cooked the beans, to be added to a chili today, mmmmm). The extracted colour was much more red than blue. I added more water and some alum, to act as a co-mordant, then I dumped in my fabric. In retrospect perhaps co-mordanting was a mistake; premordanting fabric that has been properly stripped would typically give a much stronger colour.

Before dyeing: off-white bamboo-rayon socks, and 8 m/m silk habotai scarves that were previously dyed with logwood and alum mordant.
I also, inspired by this Spirit Cloth post, tied some black beans into a rayon-spandex (95%-5%) tshirt and threw it into the pot, too. Then I let everything sit at room temperature, with a plate on top to keep the fabric all underwater, overnight.

Monday, April 7, 2014

Slow Textiles: A Toothbrush-Rug / Naalbinding Bowl

I'm figuring out how to do naalbinding! Old skool! It started with a lesson in "toothbrush rug" making from my friend Nadine, who taught herself using this great tutorial


Getting started, March 7th.
So called because the large flat needle used has been typically whittled from the handle of an old toothbrush for the past few decades, this rag-rugmaking method is actually a scaled-up rag-yarn version of a technique that predates knitting and crochet, and would have been used by my own ancestors beginning in the early medieval period when the Vikings began settling in the British Isles.

Sunday, January 12, 2014

Work-in-progress: Deep Freeze Fest lamppost cozy

Before Christmas, I submitted an application to create a lamppost cozy for the Deep Freeze Festival with some friends, which we installed this yesterday morning at the first day of the festival. We used a mixed-media approach, with a combination of dyed, sewn, hooked, luceted, embroidered, and felted motifs. If by some long shot we are chosen for prize money, it will go to this fundraising campaign to build a local makers' shared workspace (which will have a different emphasis and equipment set than the also-awesome newly-opened makerspace at Edmonton Public Library). (Update: we won first prize, *and* the people's choice award! Thanks to anyone who took the trouble to text in a vote!)

This year's festival theme is "Here Come The Vikings!", and I knew almost nothing about actual Vikings, so I spent a couple of weeks doing research and creating a pinboard of visual references to help with the design process. Despite the elapsed millennium, there are a lot of Viking-age artefacts and archaeological sites which have given us a fairly good idea how they lived, and a lively community of re-enactors committed to recreating the smallest detail of their lives with authenticity, in addition to all the myths and legends and recent Hollywood films and television series - so, there is a lot of material to draw on, including information about period textiles. Some intriguing recent research suggests that Viking women may have fought alongside men as shieldmaidens and travelled alongside men in the invasion of England, and that they were directly involved in trade, suggesting a more egalitarian relationship between the genders than previously thought. I was also fascinated with the so-called Valkyrie figures, female figures in dress similar to that reconstructed from other archaeological finds, carved on runestones or cast in metal, holding shields and either a sword or a drinking horn. I felt that these images could represent shieldmaidens, and could also be adapted to represent traders and weavers and Skadi, the goddess of winter. In the end, this piece will celebrate strong women, winter, and the creative spirit!

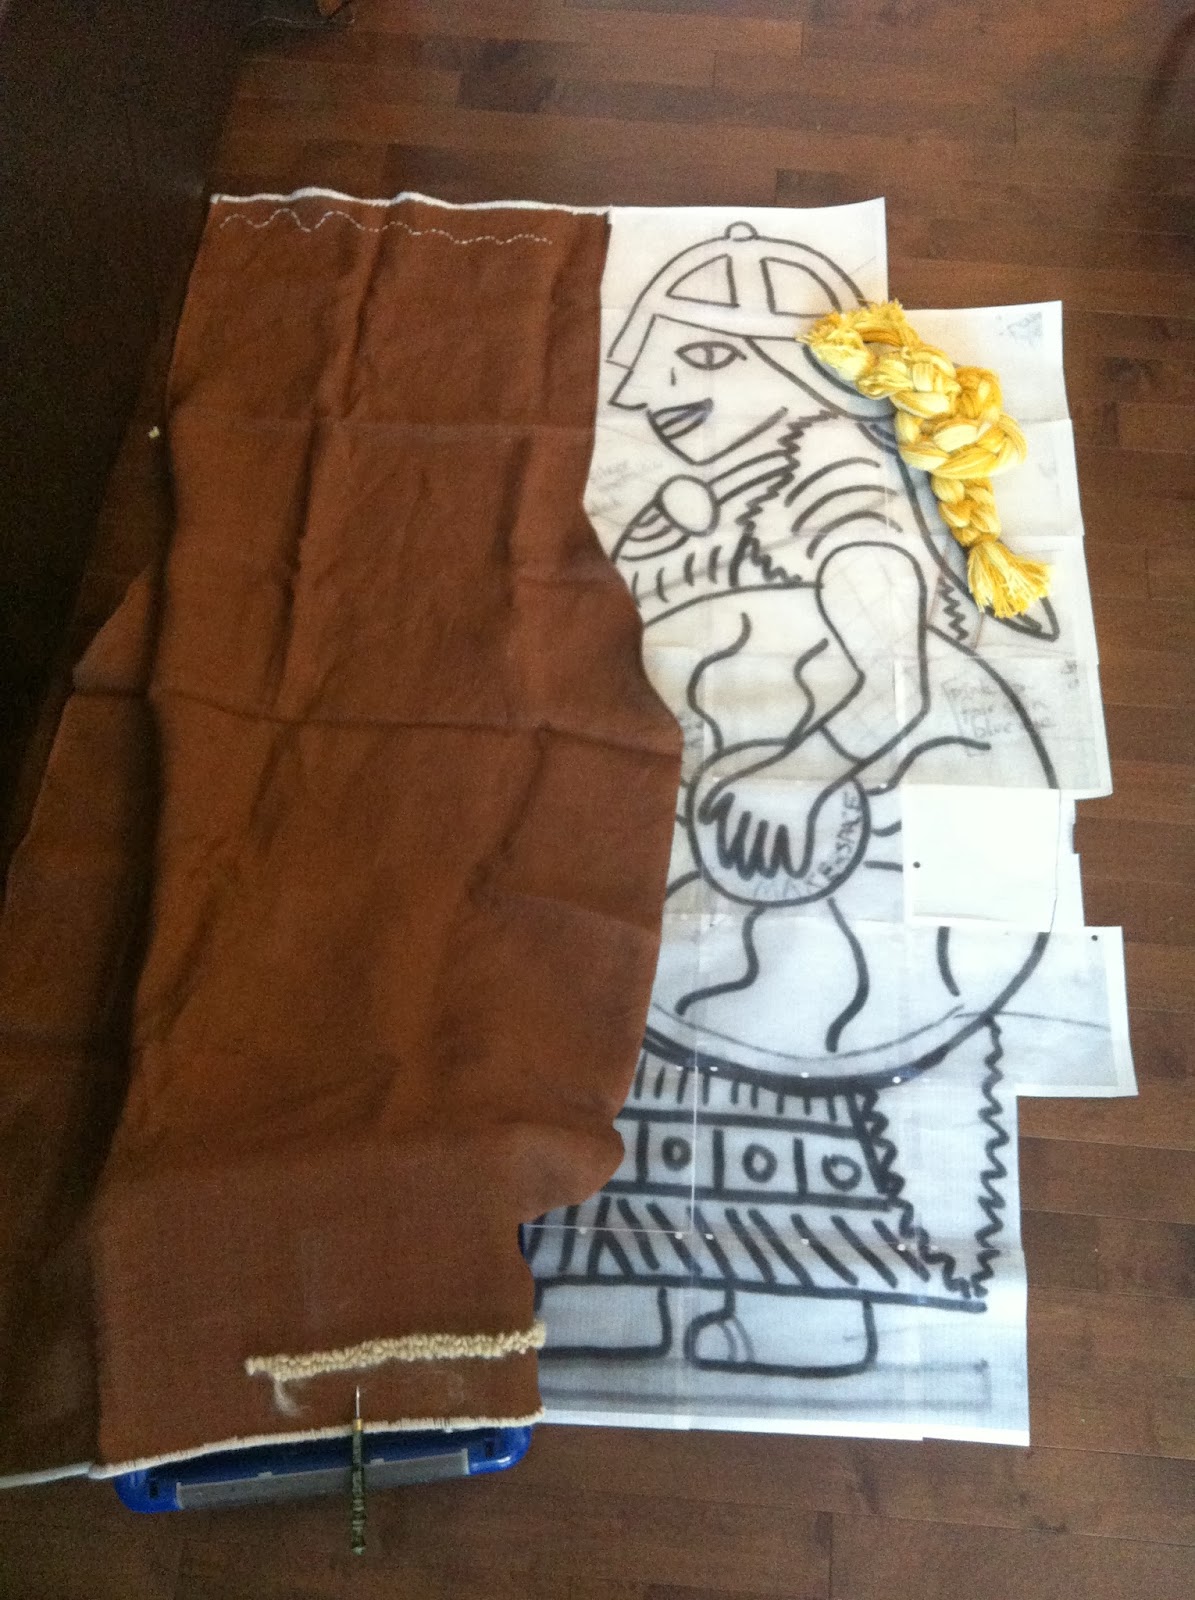
First draft, shieldmaiden, modified from a 9th-century Valkyrie figurine found in Suffolk. I really wanted an authentic medieval feeling to the design, at least as a starting point.
Final concept drawing, winter goddess Skadi as a shieldmaiden.
I adapted our design from the outlines of Viking-period Valkyrie figure artefacts, got some feedback from my collaborators, enlarged the final version to fit the scale of the lamp-post cover (six. feet. tall!), and then began making textile magic! Here are some photos of the process from beginning to end:

Drawing enlarged to full size to create pattern (which was transferred using interfacing as a substitute for red dot tracing fabric). Jute backing sewn to size, edges whipstitched, and some snow hooked in using wool roving. The braid is a mix of woolen fabric and yarn, made as a four-strand plait then knotted as seen in the original Valkyrie figurines.
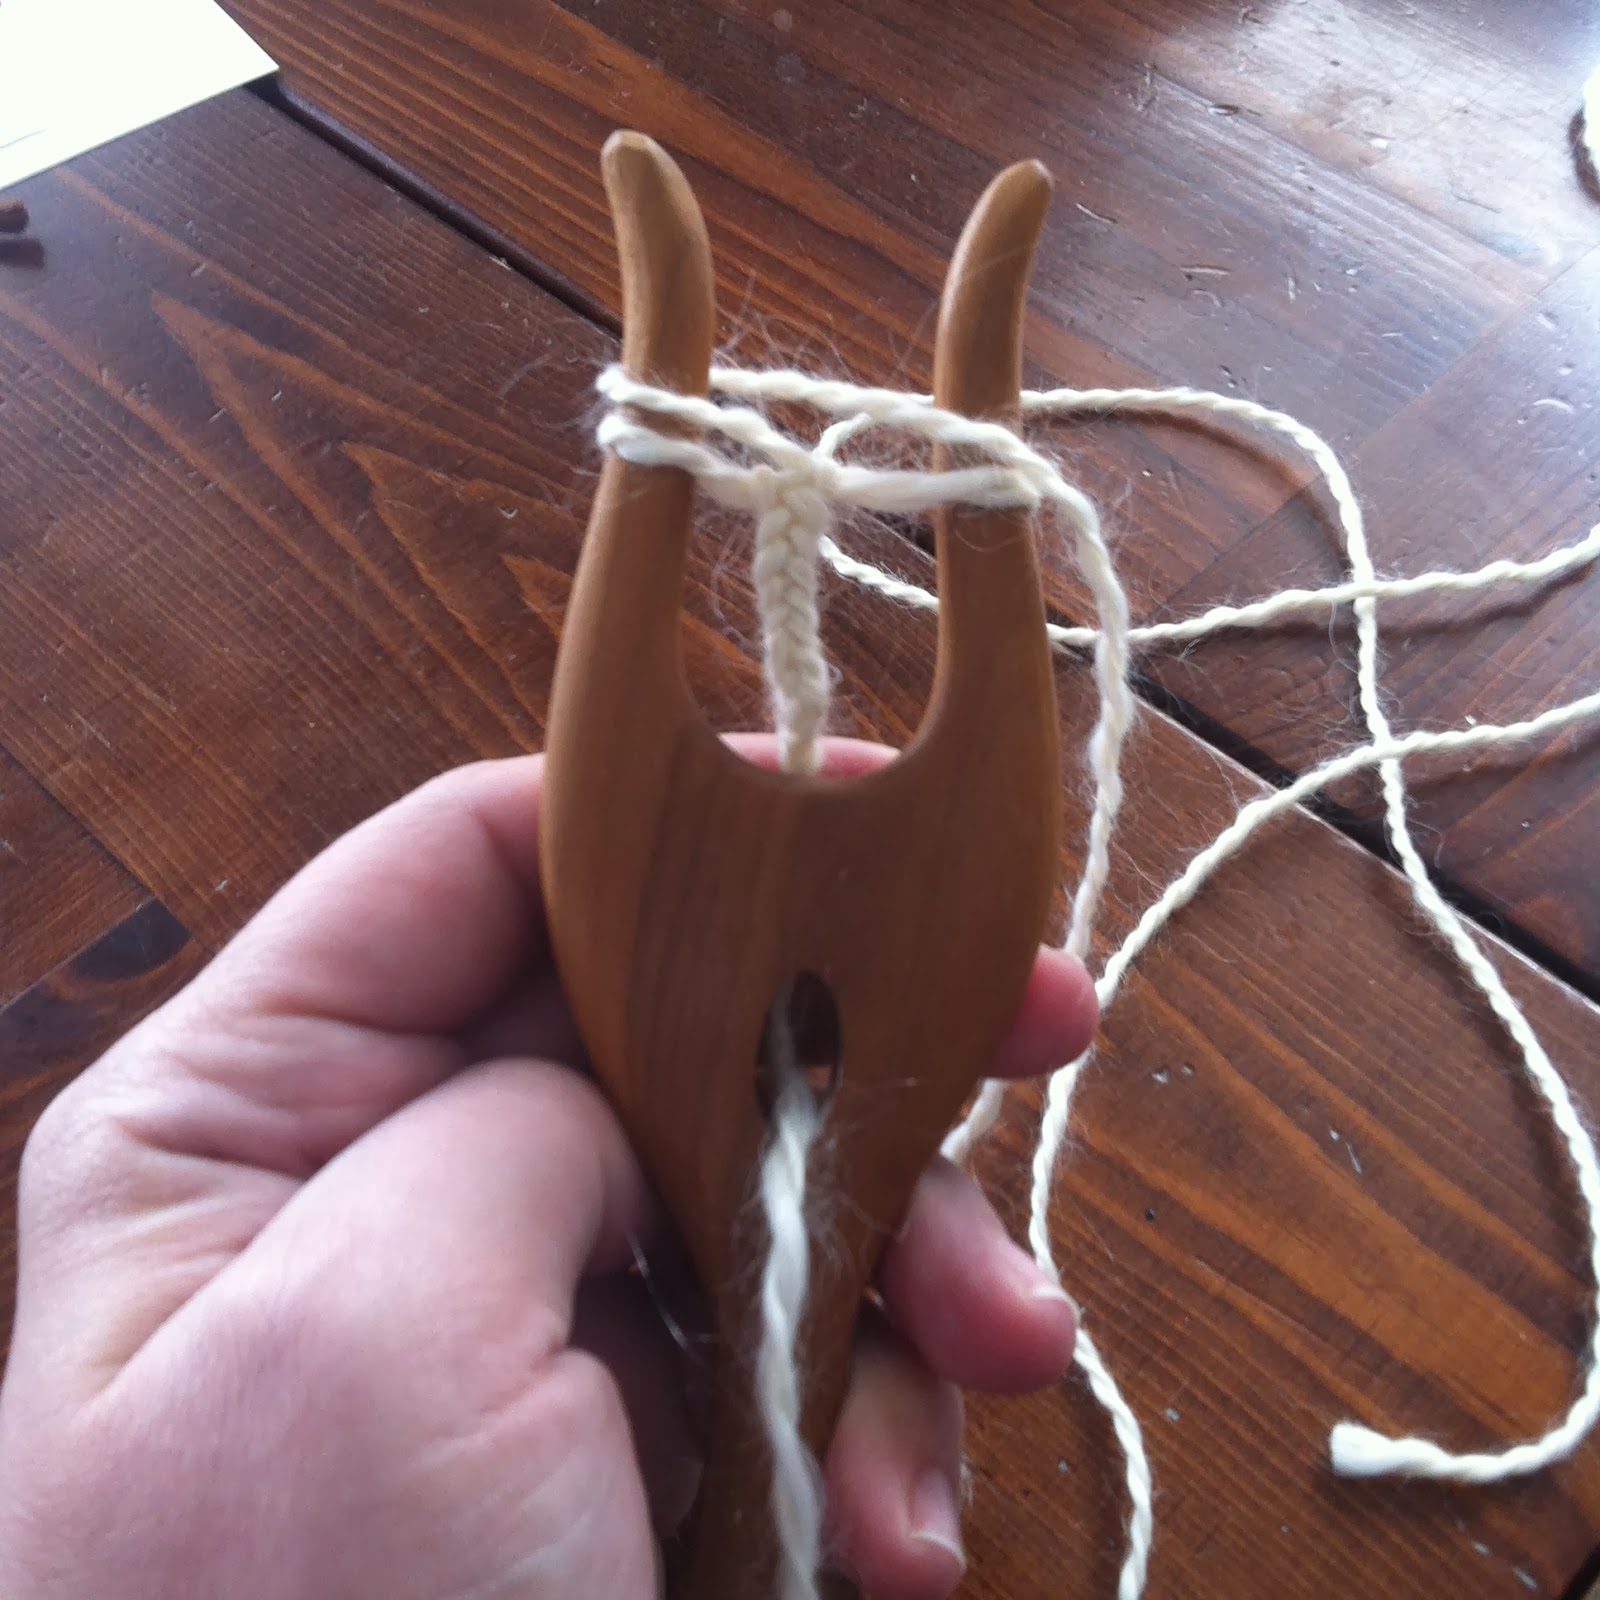
Making lucetted square cord using a beautiful handspun yarn from another local artisan (it's Alliston Findlay's Yeti blend, so lovely to work with). This cord was used for the drinking horn, and similar cord made from a machine-spun pure wool yarn was used for the bowstring.
A length of indigo shibori I made in the surface design course I've previously described, accordion-pleated and sewn - at which point I realized it needs to become the front panel of a skirt for me.
Luckily I had another length of shibori that was much better suited to becoming an apron dress and having the entire middle section covered by a shield. The pleats at the bust really worked beautifully with the large-scale mokume at that end of the fabric. Also, this pale indigo approximates the woad thay would have used during the period in western and northern Europe. The straps and trim are grey woolen fabric that I overdyed to green using acid dyes, in a shade that is also true to period. They were eventually embroidered in a woad blue yarn from Briggs & Little.
Making progress: helm in two colours of felted woolen fabric, braid, skis, and apron dress all sewn in place.

Tearing off the paper pattern after thread-sketching the faux quilting onto the sleeve (Yes, she is m'lady Greensleeves!). This project was my first try at both applique and thread-sketching, although I've been sewing off-and-on since forever.
My final photo at home before the installation. Shield cut out by Marissa and sewn by me after her first attempt went sideways - I love the shimmer and texture that her fabric choices added. The leather boots and needle-felted hands are by Jasmin. Cheesecloth added under the the skirt edge and at the top of the apron dress to represent the linen kirtle, bow and drinking horn in place, details embroidered on apron dress, and the fur cloak is hooked in a mix of fabrics (and not quite complete, but time's up!).
Installed on Alberta Avenue for Deep Freeze Festival 2014. Brooch and beads and needle-felted-embroidered-and-button-embellished face by Jasmin. Face and hair sewn in place by Marissa.  You can also watch a Vine that Marissa made to show all angles of the completed lamp-post cover - well, almost all angles.
Photo via Marissa of our team posing with the completed lamppost cover.
I've titled this post work-in-progress, partly because I actually would still like to do more hooking and add more details to the background, despite it having already hung outside all weekend. (It was right beside one of the firepits, too, so it smells of woodsmoke!) This will probably be on permanent display in the makerspace when it opens, with the intent that people working in the space can continue to add details to it. 


Tuesday, October 1, 2013

Indigo Vat Party, and Sharpening The Synthetic Vat

On Saturday, I had a few friends over to play with indigo. I provided the space, food, reference books, whatever equipment I had lying around, and some clothes lines; Lesley brought synthetic indigo stock solutions and her equipment; and everyone brought their own fabric, clothing, and yarn to dye. Deanna also brought three of her students in a high-school fashion course. It was so much fun!!

Fresh vat of white indigo. 

Thursday, July 18, 2013

U of A Surface & Textile Design course

Lucky me, last week I got to go to the world's coolest summer camp!

As part of the University of Alberta's Residential Interiors certificate program (which I'm still gradually completing), they are offering a handful of courses as one-week intensives (instead of a weekly evening class), including Surface and Textile Design. Our instructor for this very hands-on studio course was fibre artist Lesley Stafiniak. We learned wet-felting, needle-felting, shibori, batik, and silk-painting techniques, watched a documentary about natural dyes, and discussed pattern creation techniques. My mind is still buzzing with all the possibilities.

Wednesday, June 26, 2013

Dyeing silk with blueberries, logwood, and onionskin

Time to make some end-of-schoolyear gifts for the kids' teachers! 

I started with a dozen 8m/m 11" x 60" Chinese habotai silk scarves. (I know, not at all local, but great for gift-giving and a nice size to allow me to experiment with different dyeing techniques.)

Tuesday, April 30, 2013

Bioregional dyeing in Alberta

Lately I've had my nose down, researching what fibres and dyes I can use for my projects that are completely local (I'll save my thoughts on regional fibres for another post.). Although I have used commercially-made acid dyes to dye fabrics in the past, my experience with natural dyes has been limited - so, I'll be blogging about it as I learn. I'd love to grow the dye plants that can be grown here in USDA Zone 3, and also take a bio-regional approach by foraging for dye plants that grow wild here.
rose hips and bark from today's walk
There is basic information about natural dyeing using local plant materials here and here and some inspirational photos here; I'm also now doing more detailed research using the books from this amazing bibliography. Oh, and this link talks about traditional natural dyes used by first nations artisans for porcupine quills, which may provide some more ideas for bioregional dyeing.

My dyeing set-upI'm hoping to work outside when the weather is good, but the ventilation is good in my kitchen when I'm working with nontoxic dyestuffs. I already have pH paper, a big enamel lobster pot, a thrifted glass casserole dish, thrifted canning jars, tongs, a dye measuring spoon, and a set of Majic Carpet acid dyes with formula books in my rug hooking stash. Oh, and a propane camp stove in my backpacking box, and a clothesline that needs to be installed. Yesterday I visited a local art supply shop and added a tjanting tool for batik work and a natural indigo dyeing kit, and ordered some goodies from Maiwa in Vancouver. There may be some additional instuments that are part of the materials for the Surface & Textile Design intensive at the U of A in July (so. very. excited.). I still need to look for second hand: more dye pots, slotted spoons, bowls, and measuring spoons - made of stainless steel or enamel or (if I get lucky) copper - and a kitchen scale and hot plate.

Dye sources I will plant in my new garden (many are also food sources, yay!):
  • Rhubarb leaves (note: poisonous!)
  • Hollyhock 'nigra', for the blossoms
  • Heather
  • Woad (I have ordered seeds from Wearing Woad in BC - a noxious weed here so they *must* be harvested before going to seed)
  • Carrots (I have seeds from Cubits in Ontario)
  • Beets (I have seeds from Cubits) (too highly fugitive)
  • Blueberry
  • Cherry tree and/or pear tree - for the leaves
  • Blackberries - for the leaves, berry dye is fugitive
  • Marigolds, for the blossoms (which coincidentally are our city's official flower - no idea why, since they're not exactly local)
Dye sources to forage locally (many of these are wild or invasive):
  • dandelion
  • goldenrod
  • big basin sagebrush / Artemesia tridentata
  • curly dock / Rumex crispus
  • sheep sorrel / Rumex acetosella (this can give a beautiful green)
  • tansy / Tanacetum vulgare
  • horsetail / Equisetum arvense
  • fennel / Foeniculum vulgare
  • St John's wort / Hypericum perforatum
  • prickly pear fruit
  • elderberry
  • Canada thistle / Cirsium arvense
  • common mullein / Verbascum thapsus
  • prairie sunflower / Helianthus petiolaris
  • rose hips or petals from the wild roses that flourish in the nearby ravine
  • bark from dead lodgepole pine (on a trip to the foothills) or birch
  • fallen leaves from birch or trembling aspen
  • acorns from burr oak (which is planted as a shelterbelt tree on the Prairies)
  • there may be more on the noxious weed list that I can experiment with
  • certain lichens and mosses grow in abundance in the woods near me, so they might also be worth trying
In addition, I can collect wood ash from the weekend bonfires the teenagers have down in the ravine, and dig a little of the red clay that's everywhere here to use as a source of iron. I should also experiment with using our hard local water instead of distilled water to see how it changes the colours I get.

Reference books I am using:
  • Harvesting Color, by Rebecca Burgess (2011) 
  • A Weaver's Garden, by Rita Buchanan (1999)
  • Wild Color (Revised & Updated), by Jenny Dean (2010)
  • Eco Colour, by India Flint (2010)
  • The Complete Guide to Natural Dyeing, by Eva Lambert & Tracy Kendall (2010)
  • The Handbook of Natural Plant Dyes, by Sasha Duerr (2010)
  • Alberta Agriculture's Weeds of the Prairies (2000) for plant identification