 |
| Getting started, March 7th. |
Monday, April 7, 2014
Slow Textiles: A Toothbrush-Rug / Naalbinding Bowl
I'm figuring out how to do naalbinding! Old skool! It started with a lesson in "toothbrush rug" making from my friend Nadine, who taught herself using this great tutorial.
So called because the large flat needle used has been typically whittled from the handle of an old toothbrush for the past few decades, this rag-rugmaking method is actually a scaled-up rag-yarn version of a technique that predates knitting and crochet, and would have been used by my own ancestors beginning in the early medieval period when the Vikings began settling in the British Isles.

Saturday, April 5, 2014
DIY: a coated denim jacket for spring
My daughter fell hard last autumn for the coated denim available from the premium brands. It's got great texture and adds a bit of edginess to an outfit. When I took a closer look, I realized that coated denim is actually the traditional waxed cotton canvas used for waterproof outerwear by sailors and hunters - think sou'westers and field jackets - and knew this would be a simple DIY. The treatment will last best on a garment that won't need to be washed all the time, so we agreed that a classic denim trucker jacket would be better than jeans, and perfect to wear now that the weather is finally starting to warm up.
I started with a dark indigo denim jacket with classic lines we found at a thrift shop, washed well (for the obvious reasons, plus, my daughter is actually allergic to the scented detergent used by my favourite thrift shop).
I looked over the DIY instructions here and here, then broke out the all-natural no-petroleum Otter Wax and a hair dryer. It's simple: rub the wax on with long, smooth strokes until the fabric goes dark, then heat with a hair dryer to make sure the wax has penetrated.
Let the wax set for 24 hours, and you're done! Here's the finished jacket (total time investment: less than an hour, not counting the shopping time; total cost: under $30, including the bar of wax which we can use for many more projects).
To clean coated denim, you want to avoid the use of detergents or dry-cleaning solvents that will remove the wax finish. This means the default suggestion comes from the world of raw denim: seal it in a plastic bag and throw it in the freezer to kill bacteria. Of course, you can always repeat what we did to re-coat the denim if you wash it and the wax gets stripped off.
Note: This post is part of my #30DaysOfMaking Challenge.
I started with a dark indigo denim jacket with classic lines we found at a thrift shop, washed well (for the obvious reasons, plus, my daughter is actually allergic to the scented detergent used by my favourite thrift shop).
 |
| Before treatment. |
 |
| It's amazing how quickly you can see the difference in texture! In this photo, the left front is untreated, while the right front has been coated in wax. Otter Wax feels like a really waxy lip balm on your fingertips, and has a slight, pleasant scent. |
 |
| I coated everything but the arms and inside collar with a thin, even coat of wax, warmed the jacket with the hottest setting on my hair dryer to help the wax sink into the denim, then left it hanging in a cool dry place to let the wax set for 24 hours. |
Note: This post is part of my #30DaysOfMaking Challenge.
Friday, April 4, 2014
The #30daysofmaking Challenge: Join me!

I'm making something - or part of something - every day, and I'm posting photos to keep myself accountable. Join me!
The only rule is that you post photos of things you are making by hand, for 30 days, on your choice of social media, with the hashtag #30daysofmaking.
This challenge is about sharing the joy of making, so you get to choose whether your 30 days are consecutive or nonconsecutive.
You get to choose whether you'll work on a different project every day, or concentrate on a single project.
Have fun! I look forward to seeing what you're making!
(sidebar button info for bloggers is after the jump)
You get to choose whether you'll work on a different project every day, or concentrate on a single project.
Have fun! I look forward to seeing what you're making!
(sidebar button info for bloggers is after the jump)
Sunday, February 9, 2014
The #30DaysOfMaking Challenge, and a scarf (updated)
I need a push to start finishing some of my many works-in-progress, and to get myself into the habit of spending time in my studio every day, so I've decided I'm going to set a challenge for myself that starts today (my birthday!).
I'm going to make something - or part of something - every day, and I'm going to post photos to keep myself accountable.
A daily blog post feels like it would take too much time away from the creative process, so instead I'll tweet about it, and do an occasional summary post. People already tweet (and Instagram, and Tumblr, and all that jazz) using #whatImade #whatImadetoday and #workinprogress, but I thought it would be more fun if I created a hashtag for anyone to use who'd like to try such a challenge for themselves. Hence #30DaysOfMaking. Join me! The only rule is that you post a photodaily for 30 days with the hashtag of something you are making by hand.
(April 4th Update: I quickly realized that 30 consecutive days is too ambitious for most people, myself included. This challenge is about sharing the joy of making, not about guilt! I also made a sidebar button for anyone who wants to join in - you can get that and see the updated rules here.)
Here's what I'm making today:
I'm going to make something - or part of something - every day, and I'm going to post photos to keep myself accountable.
A daily blog post feels like it would take too much time away from the creative process, so instead I'll tweet about it, and do an occasional summary post. People already tweet (and Instagram, and Tumblr, and all that jazz) using #whatImade #whatImadetoday and #workinprogress, but I thought it would be more fun if I created a hashtag for anyone to use who'd like to try such a challenge for themselves. Hence #30DaysOfMaking. Join me! The only rule is that you post a photo
(April 4th Update: I quickly realized that 30 consecutive days is too ambitious for most people, myself included. This challenge is about sharing the joy of making, not about guilt! I also made a sidebar button for anyone who wants to join in - you can get that and see the updated rules here.)
Here's what I'm making today:
 |
| The Doctor Who fan club scarf pattern from the early 80s, republished here by PBS and also discussed in minute enough detail to warm any geek's heart at doctorwhoscarf.com. |
Sunday, February 2, 2014
5 tips for using Pinterest for research
So, yesterday was Social Media Breakfast Edmonton's first all-day Camp, and I was invited to give an introductory talk on Pinterest. Fun, right?
Except that the day before, one of my kids and my husband both came home sick with some evil virus, and by the time I'd finished adding the screencaps to the slides at 9pm you could fry an egg on my forehead. No SMBYEG Camp for me! Sigh. Luckily, the organizers were able to recruit gorgeous, talented, and capable Genoa to fill in for me and read my slides with only 13 hours' prep time. I hear she was magnificent. She's my hero.
Here are my Powerpoint slides imported into Prezi, if you'd like to take a look. (The format is a bit peculiar, and I'm still figuring out how to fix the transcript, which is currently only the text on the slides in random order. Completely useless if you want to know what was actually said.)
(By the way, if you are a blogger or small business owner, I suggest that you check out these great posts about setting up your account and optimizing your blog for Pinterest, and look at the Viraltag and Octopin management tools in addition to Tailwind's analysis tool. Oh and the rules for running contests on Pinterest have just changed, so read the fine print before you follow any of the advice on contests.)
So, let's pull out of my talk the 5 best tips I have for using Pinterest as a research tool and visual resource, instead of a branding and marketing tool or shopping aid.
 |
| screencap of my boards on my profile page |
1. Your filing system: If your goal is zillions of followers, enormous boards with hundreds of pins are supposedly a follower-magnet - but if you are using Pinterest for research, it becomes difficult to find the pin you're looking for. So, make your categories specific. I learned this the hard way: my crafty board quickly became utterly unmanageable, so I split it up. In its place, I currently have sewing, weaving, rug hooking, felting, natural dyeing, embroidery, knitting/crochet/tatting (which will likely get split), holiday crafts, and miscellaneous crafts boards. Plus a few that are for specific projects I'm working on, and some of which are secret boards (which are marvelous for those projects-under-development that you're not ready to unveil yet).
2. Following people whose pins inspire
you seems like a no-brainer, especially if you're using Pinterest to inspire your art or learn more about relatively esoteric topics - but beyond your existing connections, how do you find more people
who share your taste and interests without wasting inordinate amounts of time? I do it by searching
for boards on my interests, and seeing who repinned the things I pinned. I also found I needed to be selective in who I follow back, because when I followed everyone, my feed
quickly got both unmanageably huge and repetitive - and visiting it felt like a chore, instead of inspiring me. Following a single board instead of a person's entire feed helps with that.
 |
| Over 4000 likes. I'm a little behind on my filing. |
3. The Like Button: I
tend not to repin things immediately; instead I
click that little heart button, especially when I’m in the middle of
doing a search related to a project. Then I go back through my likes, check the source link, make sure things are properly attributed, and repin the keepers by category onto my boards. This strategy also works for me because it keeps me from repinning certain pinners' entire feeds, and
helps me focus on pinning to the boards that reflect my interests and
strengths. It does mean I tend to pin lots at a time, but sporadically, so I try to do it during low-use times (like after 10pm MST) so I'm
not flooding the feed. However, it runs contrary to the “add pins regularly”
and “space your pins out” advice that is commonly given. Users like me need a
tool that lets us flag and schedule pins from our “likes” folder! (Developers, are you listening?)
4. Pinterest's
search engine is not comprehensive; it gives you a snapshot of what has been
pinned recently. It also does this annoying thing where slow cooker recipes
will show up when you're searching for "slow design" or "slow
fashion" - which is improving but still an issue. So, it helps to be persistent, and to do consecutive searches
using related terms. For example, when I was researching Viking period
artifacts for the Deep Freeze lamppost cover I made with Marissa and
Jasmin, I searched on "Viking" "8th 9th 10th century"
"tortoise brooch" "helm" "apron dress" and so on.
Each of the useful search results had been pinned to a board by someone, so I
also checked out what else they had pinned to the board
– and I checked the “related pins” section (scroll way down
on each pin to find it). Also, search for boards. Using the board search, I found dedicated reenactors with a collection of
well-researched images and links that it might have taken me months to achieve
on my own using Google. (I've also used the board search to find other people interested in various aspects of the slow movement to follow.)
5. Explore Interests is a recent addition to Pinterest's toolset that's still incomplete. Here is what my preview looked like:

It works fairly well at
guessing what keywords you’d be interested in based on what you have pinned
recently. Not perfectly: it still gets confused by uncommon searches ("inch mat" hooked rugs, fashion brand "Alabama Chanin", and Viking "tortoise brooches" yielded car mats, Alabama, and turtles), and it doesn’t realize if you’ve done a series of related searches that it can group
them (all my Viking project searches came up separately). However, as you can see, it's pretty good - and clicking each of those pictures takes you to a screen full of pins on that topic, similar to the (very useful) suggested pins that Pinterest puts in your feed based on your previous pins. I can see this feature becoming very useful for ongoing research projects, passions, and pastimes - even if it was originally designed to sell us more stuff.
I hope this is helpful!
Sunday, January 12, 2014
Work-in-progress: Deep Freeze Fest lamppost cozy
Before Christmas, I submitted an application to create a lamppost cozy for the Deep Freeze Festival with some friends, which we installed this yesterday morning at the first day of the festival. We used a mixed-media approach, with a combination of dyed, sewn, hooked, luceted, embroidered, and felted motifs. If by some long shot we are chosen for prize money, it will go to this fundraising campaign to build a local makers' shared workspace (which will have a different emphasis and equipment set than the also-awesome newly-opened makerspace at Edmonton Public Library). (Update: we won first prize, *and* the people's choice award! Thanks to anyone who took the trouble to text in a vote!)
This year's festival theme is "Here Come The Vikings!", and I knew almost nothing about actual Vikings, so I spent a couple of weeks doing research and creating a pinboard of visual references to help with the design process. Despite the elapsed millennium, there are a lot of Viking-age artefacts and archaeological sites which have given us a fairly good idea how they lived, and a lively community of re-enactors committed to recreating the smallest detail of their lives with authenticity, in addition to all the myths and legends and recent Hollywood films and television series - so, there is a lot of material to draw on, including information about period textiles. Some intriguing recent research suggests that Viking women may have fought alongside men as shieldmaidens and travelled alongside men in the invasion of England, and that they were directly involved in trade, suggesting a more egalitarian relationship between the genders than previously thought. I was also fascinated with the so-called Valkyrie figures, female figures in dress similar to that reconstructed from other archaeological finds, carved on runestones or cast in metal, holding shields and either a sword or a drinking horn. I felt that these images could represent shieldmaidens, and could also be adapted to represent traders and weavers and Skadi, the goddess of winter. In the end, this piece will celebrate strong women, winter, and the creative spirit!
 |
| First draft, shieldmaiden, modified from a 9th-century Valkyrie figurine found in Suffolk. I really wanted an authentic medieval feeling to the design, at least as a starting point. |
 |
| Final concept drawing, winter goddess Skadi as a shieldmaiden. |
I adapted our design from the outlines of Viking-period Valkyrie figure artefacts, got some feedback from my collaborators, enlarged the final version to fit the scale of the lamp-post cover (six. feet. tall!), and then began making textile magic! Here are some photos of the process from beginning to end:
I've titled this post work-in-progress, partly because I actually would still like to do more hooking and add more details to the background, despite it having already hung outside all weekend. (It was right beside one of the firepits, too, so it smells of woodsmoke!) This will probably be on permanent display in the makerspace when it opens, with the intent that people working in the space can continue to add details to it.
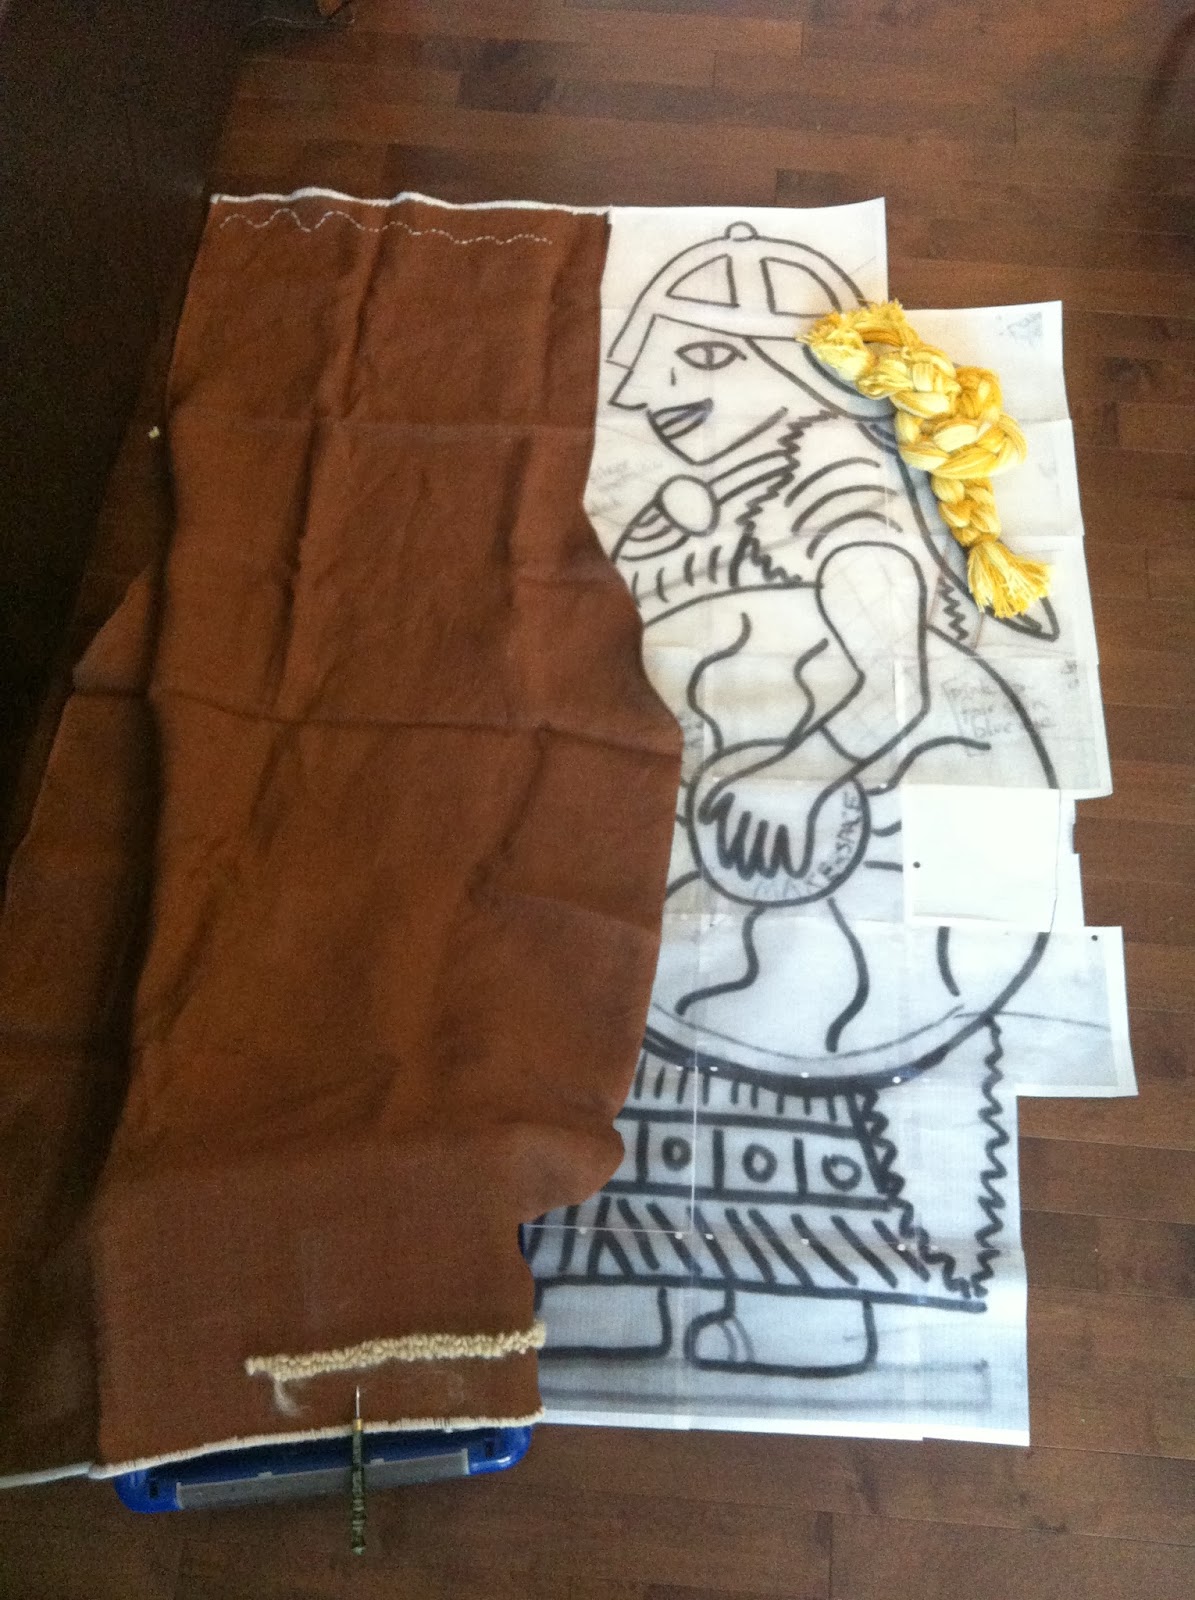 |
| Drawing enlarged to full size to create pattern (which was transferred using interfacing as a substitute for red dot tracing fabric). Jute backing sewn to size, edges whipstitched, and some snow hooked in using wool roving. The braid is a mix of woolen fabric and yarn, made as a four-strand plait then knotted as seen in the original Valkyrie figurines. |
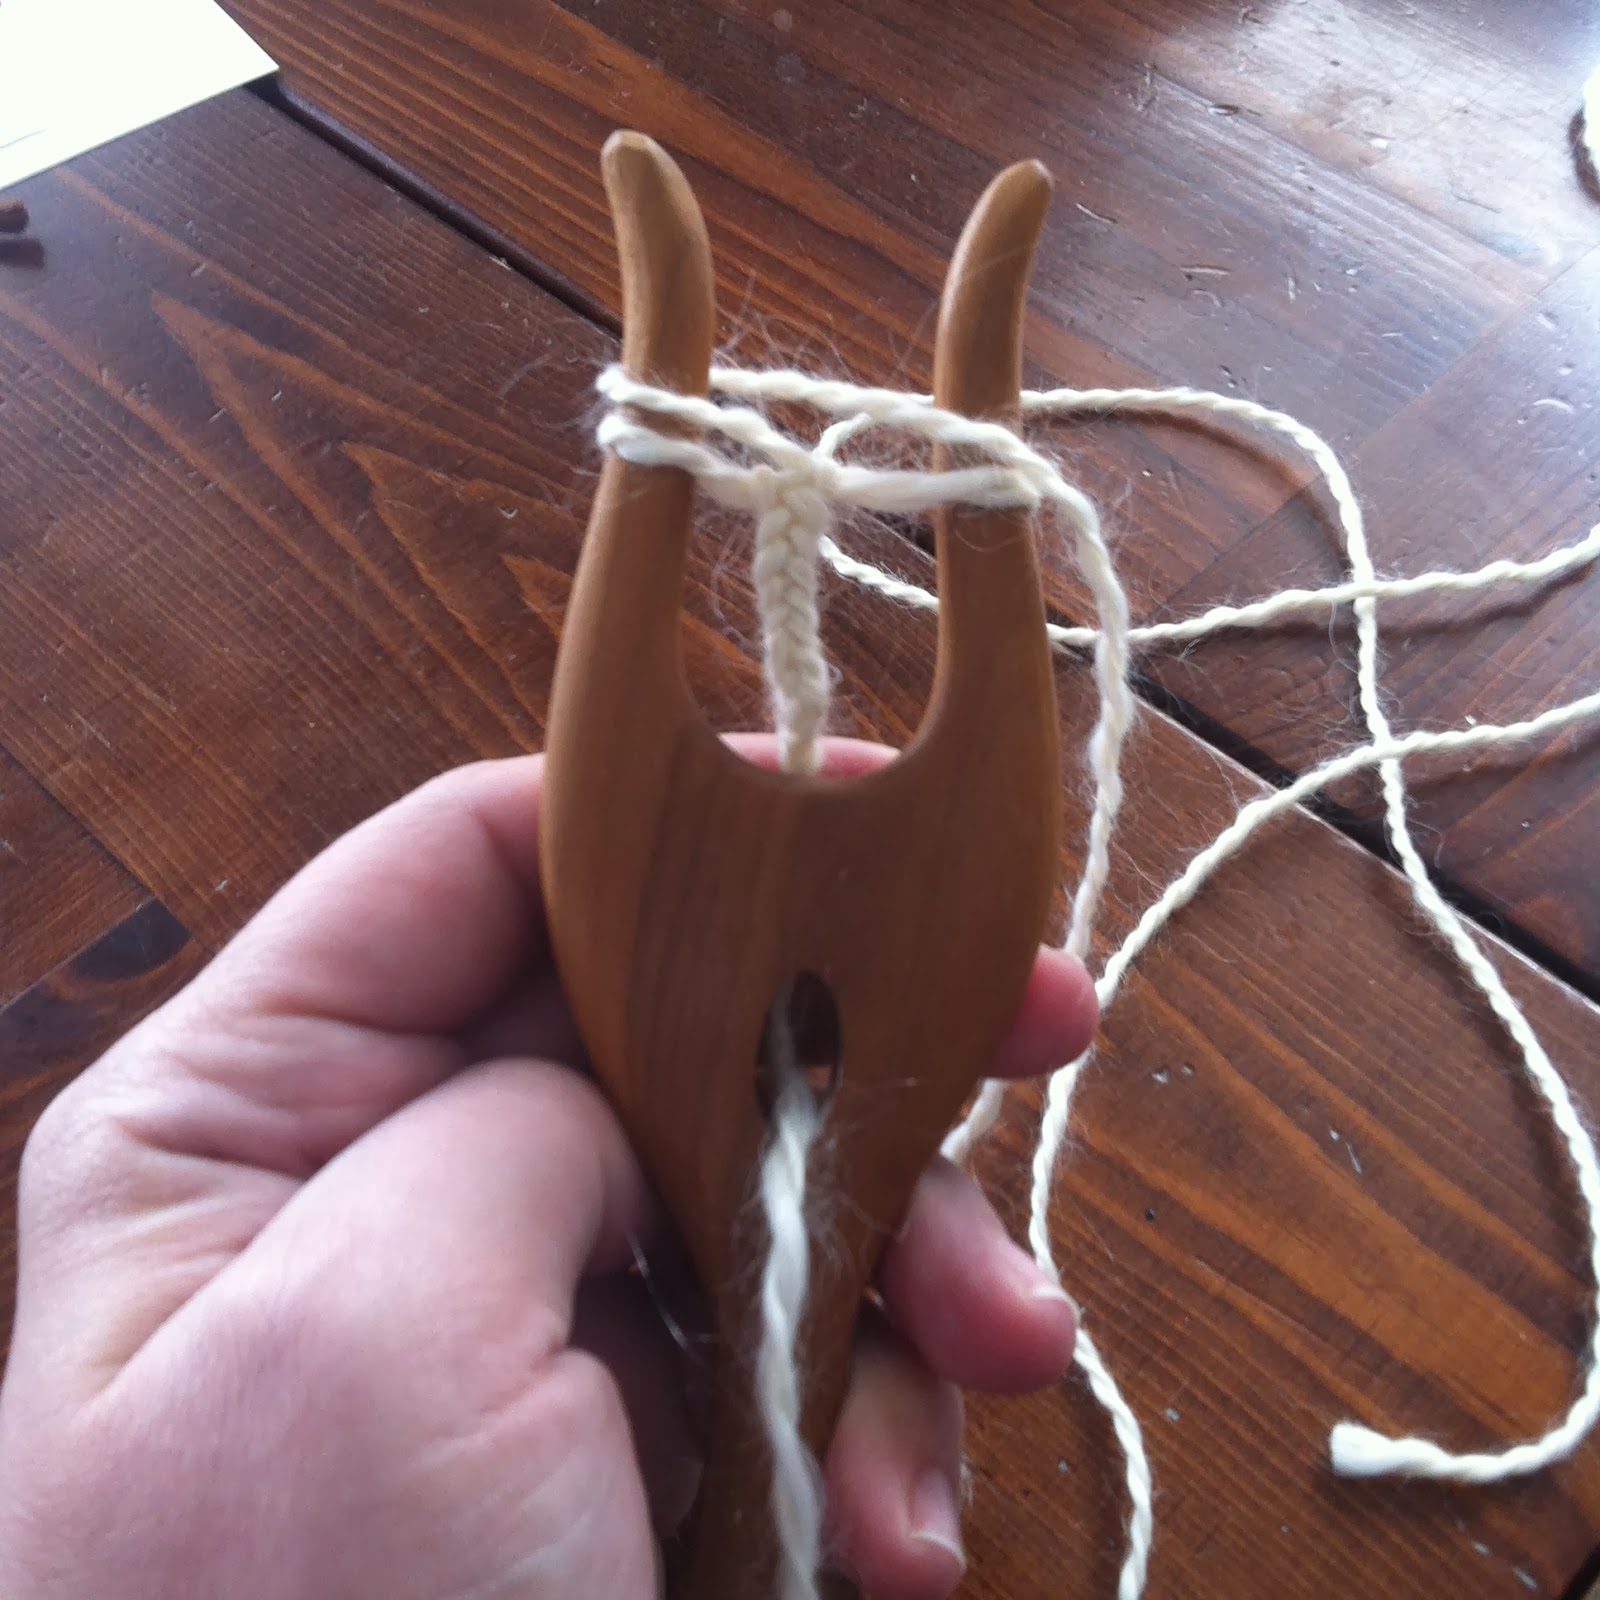 |
| Making lucetted square cord using a beautiful handspun yarn from another local artisan (it's Alliston Findlay's Yeti blend, so lovely to work with). This cord was used for the drinking horn, and similar cord made from a machine-spun pure wool yarn was used for the bowstring. |
 |
| A length of indigo shibori I made in the surface design course I've previously described, accordion-pleated and sewn - at which point I realized it needs to become the front panel of a skirt for me. |
 |
| Luckily I had another length of shibori that was much better suited to becoming an apron dress and having the entire middle section covered by a shield. The pleats at the bust really worked beautifully with the large-scale mokume at that end of the fabric. Also, this pale indigo approximates the woad thay would have used during the period in western and northern Europe. The straps and trim are grey woolen fabric that I overdyed to green using acid dyes, in a shade that is also true to period. They were eventually embroidered in a woad blue yarn from Briggs & Little. |
 |
| Making progress: helm in two colours of felted woolen fabric, braid, skis, and apron dress all sewn in place. |
 |
| Tearing off the paper pattern after thread-sketching the faux quilting onto the sleeve (Yes, she is m'lady Greensleeves!). This project was my first try at both applique and thread-sketching, although I've been sewing off-and-on since forever. |
 |
| My final photo at home before the installation. Shield cut out by Marissa and sewn by me after her first attempt went sideways - I love the shimmer and texture that her fabric choices added. The leather boots and needle-felted hands are by Jasmin. Cheesecloth added under the the skirt edge and at the top of the apron dress to represent the linen kirtle, bow and drinking horn in place, details embroidered on apron dress, and the fur cloak is hooked in a mix of fabrics (and not quite complete, but time's up!). |
 |
| Installed on Alberta Avenue for Deep Freeze Festival 2014. Brooch and beads and needle-felted-embroidered-and-button-embellished face by Jasmin. Face and hair sewn in place by Marissa. You can also watch a Vine that Marissa made to show all angles of the completed lamp-post cover - well, almost all angles. |
 |
| Photo via Marissa of our team posing with the completed lamppost cover. |
Sunday, December 8, 2013
A Canadian Christmas: mock cherry (cranberry) pie
I have no idea if this recipe is a Maritime food tradition, per se, but my Christmas holidays are incomplete without it, and it features one of the great wild foods of of eastern North America: the cranberry. Regional magazine Saltscapes have printed a version of it, attributing it to author Lucy Maud Montgomery, so I guess it has a little Canadian food cred. My Nana - my maternal grandmother - made it every Christmas, and now so do I.
.JPG)
This time I used organic fresh cranberries grown in Notre-Dame-de-Lourdes, Quebec, and a handful of leftover craisins along with the raisins. You can do this with frozen cranberries too, of course. The recipe from Saltscapes calls for chopped fruit, but I use the cranberries and raisins whole.
Pearl Lantz Schofield's Mock Cherry Pie Filling
.JPG)
This time I used organic fresh cranberries grown in Notre-Dame-de-Lourdes, Quebec, and a handful of leftover craisins along with the raisins. You can do this with frozen cranberries too, of course. The recipe from Saltscapes calls for chopped fruit, but I use the cranberries and raisins whole.
Pearl Lantz Schofield's Mock Cherry Pie Filling
Subscribe to:
Posts (Atom)